
Why Your Studio Setup Determines Your Rate
Two creators use the same phone model. One charges $75 per video and struggles to book work. The other charges $400 per video and has a waitlist. The difference is not talent or the device in their hand.
The difference is the setup. A study from Wyzowl found that 89% of consumers say video quality impacts their trust in a brand. Brands evaluate your sample video the same way consumers do.
They check whether your audio is clean, your lighting is even, and your background looks intentional. If any of those three signals are weak, they move on to the next creator.
According to Whop, beginner UGC rates sit at $50 to $100 per video. Mid-level creators charge $150 to $500 per video. These creators do not own different phones. They made intentional gear choices that removed the most common brand rejection triggers: echoey audio, uneven shadows, and cluttered backgrounds.
Your studio setup directly determines which rate tier you can command. This guide walks through three budget levels, explains what each tier unlocks, and gives you a 30-day plan to move up.
The Three Pillars of a UGC Studio
Brands evaluate three things before they approve a UGC creator: audio quality, lighting quality, and background presentation. These three pillars cover the top deal gatekeepers. Clean audio, stable framing with good lighting, and an intentional background signal that you are a professional.
If any one of these three pillars is weak, your rate gets capped. A great microphone cannot fix bad lighting. A beautiful backdrop cannot fix echoey audio.
The three pillars work together. Every budget tier below addresses all three in order of priority.
Tier 1: The Bare Minimum (Under $75)
You can start creating professional UGC today with less than $75. This tier uses what you already own plus a few small purchases. The results will not compete with dedicated setups, but they will get you into the game and earning.
What You Need
- Phone camera: Any modern smartphone shoots high enough quality for brand UGC. Most brand UGC is shot on mobile and brands expect phone-quality footage.
- Window light: Find a window with indirect sunlight. Film facing the window with the light on your face. Morning and late afternoon give the softest light.
- DIY bounce: A white foam board from a craft store costs roughly $5. Place it opposite your window to bounce light back onto the shadow side of your face.
- Phone stand: A basic smartphone tripod costs $15 to $25. You can also stack books or use a clothes-stuffed bag to prop your phone, but a tripod is worth the small investment.
- Wired lavalier mic: A basic wired lav costs $15 to $25 and eliminates the most common brand rejection reason: bad audio.
What This Tier Unlocks
This tier supports beginner rates of $50 to $100 per video. You will need strong natural light and a quiet room. Your background options are limited to whatever clean wall or corner you can find.
The main limitation is inconsistency. Cloudy weather changes your light. Neighbor noise ruins your audio. You cannot shoot at night.
If you are testing whether UGC is right for you, start here. Do not wait until you have more money. Start filming, build three sample videos, and send them to brands. Your first few deals will fund the next tier.
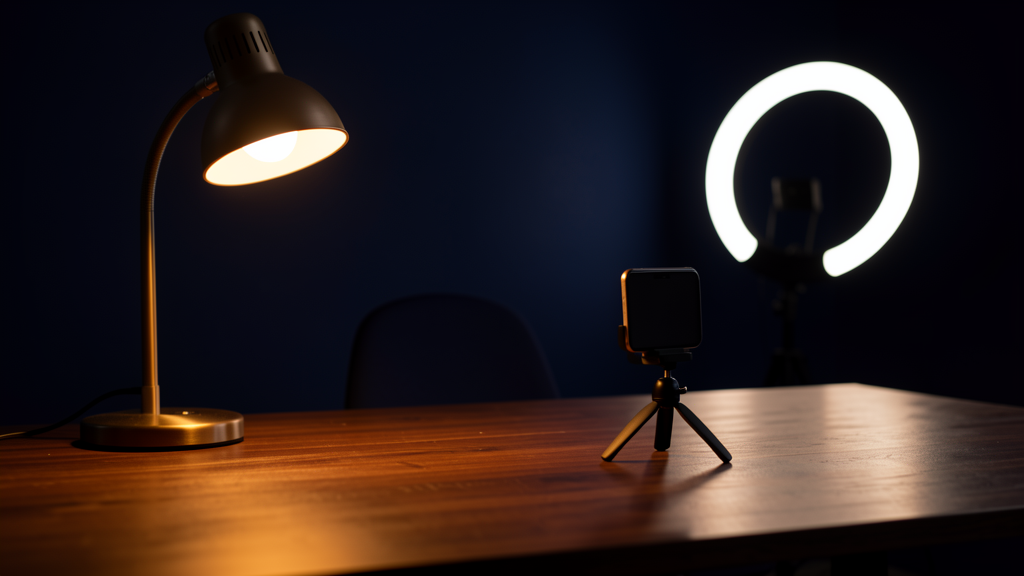
Tier 2: The $200 Sweet Spot (Best ROI)
Spending roughly $200 on three pieces of gear is the single highest-ROI move a UGC creator can make. This setup removes the three most common brand rejection triggers and unlocks rates of $300 to $500 per video.
What You Need
| Priority | Item | Cost Range | Why |
|---|---|---|---|
| 1 | Boya Mini 2 wireless lav mic | ~$60 | Eliminates room echo without needing room treatment. Wireless range lets you frame shots freely. |
| 2 | Neewer 2-pack softbox kit | ~$80 | Turns any corner into a controlled lighting environment. Key + fill in one purchase. |
| 3 | Sturdy smartphone tripod | $20-$30 | Locked-off framing signals professionalism. Handheld shots do not. |
| Optional | Small LED panel for fill | ~$40 | Adds fill light when window light is not available. Useful for evening shoots. |
Why This Tier Works
Audio is the number one ROI upgrade for UGC creators. A $60 wireless lav eliminates the echo problem that gets videos rejected instantly. The softbox kit gives you consistent lighting regardless of weather or time of day.
The tripod removes shaky framing. Together, these three items cover the first three priorities brands evaluate.
The math is simple. Four videos at your old rate of $100 earn $400. Four videos at your new rate of $400 earn $1,600.
The $200 gear investment pays for itself on your first paid video. For a detailed breakdown of how this upgrade path works, read The $200 Setup That Commands $500+ Per Video.
Tier 3: The Dedicated Workspace ($500-$800)
This tier keeps a permanent filming corner set up at all times. You walk in, turn on the lights, and record. No setup time, no hunting for good light, no shuffling furniture. This tier unlocks rates of $500 to $1,500 per video plus retainer deals.
What You Need
- Multi-light setup: Key light, fill light, and backlight. A Godox SL100D ($130) as key, the Neewer softbox from Tier 2 as fill, and a small LED panel ($40) as backlight.
- Collapsible backdrop and stand: Roughly $50. Gives you a clean, neutral background in seconds.
- Better audio: Rode Wireless Micro (~$93) or Hollyland Lark M2S (~$159). Wireless pro audio with better range and recording quality.
- Prop collection: $50 to $100 for a mix of surfaces, textures, and props that match different brand categories.
- Room treatment basics: A rug, a blanket over a chair behind you, or a pack of acoustic panels ($30 to $100) kill room echo completely.
What This Tier Unlocks
Brands pay a premium for consistency. When you can shoot multiple videos in one session with identical lighting and framing, you can deliver entire campaign packages. Retainer deals (4 to 8 videos per month at $500 to $1,500 each) become realistic because your workflow is repeatable.
This tier also lets you build a repeatable visual system across campaigns. Once your studio is set, lock in consistent choices for lighting, framing, and color. The Visual System Consistency Guide shows you how to make every video look like it came from the same creator.
Background Design on a Budget
Your background does not need to be expensive. It needs to look intentional. A blank wall with even lighting signals professionalism. A cluttered shelf with random objects signals amateur, regardless of how much you spent on gear.
The best backgrounds are free. A clean wall, a neatly arranged bookshelf, a kitchen counter with one or two styled objects, or a textured blanket pinned to the wall all work well. The key is consistency. Use the same spot for every video in a campaign so the background does not distract from the product.
For $20 to $30, you can buy fabric from a craft store, wrapping paper taped to the wall, or painted foam board. These give you color options without a permanent commitment. For $50, a collapsible backdrop kit with a stand gives you a professional look that sets up in under a minute.
Build a brand library approach. Keep three to four distinct backdrop looks that work for different brand categories. A clean white for beauty and skincare. A warm wood texture for food and beverage.
A dark neutral for tech and gadgets. Rotate based on the campaign.
Position yourself at least four feet away from the wall to avoid casting shadows on the background. Test your frame before you record. If the background adds visual noise, simplify it.
Audio That Brands Won’t Reject
Bad audio is the fastest way to get a UGC video rejected. Brands cannot use footage with echo, wind noise, or background hum. The fix costs less than $60 and takes five minutes to set up.
Room echo happens when sound bounces off hard surfaces like bare walls, tile floors, and windows. The cheapest fix is to record in a room with soft surfaces. A carpeted bedroom with a bed and curtains absorbs echo naturally. A walk-in closet full of clothes is an excellent recording space.
A $10 pack of moving blankets from a hardware store draped over a chair behind your recording position kills room echo. Acoustic foam panels start at $20 for a pack of 12 and can be mounted temporarily with removable adhesive.
For microphone choice, the rule is simple. In untreated rooms, use a lavalier mic. Lav mics pick up your voice close to your mouth and ignore the room.
In treated rooms with soft surfaces, a shotgun mic on a boom arm gives richer sound quality. Start with a lav. Upgrade to a shotgun when you have treated your recording space.
Before you send any video to a brand, run this audio QC checklist. Listen to the first 10 seconds with headphones. Check for echo, background hum from a refrigerator or AC unit, or any other ambient noise.
Confirm your voice is clear and not muffled. If any of these checks fail, re-record. Brands would rather receive a video one day late than a video with bad audio.
Lighting: The Difference Between Amateur and Pro
Lighting is the fastest visual upgrade you can make. Even lighting across your face and background signals professionalism. Uneven shadows and blown-out highlights signal amateur, regardless of your camera quality.
Natural light is free but unreliable. The sun changes position every 30 minutes. Cloud cover shifts your light from soft to flat.
If you rely on window light, you can only shoot during specific hours in specific weather. Artificial lighting removes this dependency.
Which Light Type to Buy
- Ring lights ($25 to $120): Best for talking heads, beauty shots, and close-ups. The circular shape creates a catchlight in your eyes. Limited for wider shots or product flat lays.
- Softboxes ($50 to $100): Best for flat lays, product shots, and even lighting across larger areas. The softbox diffuses light to eliminate harsh shadows.
- COB LEDs ($130 to $170): Professional quality at a budget price. The Godox SL100D at roughly $130 gives you a bright, consistent key light that works for any shot type.
The Three-Point Lighting Setup
Three-point lighting is the standard for professional video. A key light goes at 45 degrees to your right. A fill light goes at 45 degrees to your left at half brightness. A backlight goes behind you pointing at the back of your head to separate you from the background.
On a strict budget, use the one-light wonder setup. Place one softbox at 45 degrees to your face with a white foam board on the opposite side as bounce. This single light with a bounce creates a clean, professional look for under $100 total.
Your Studio-to-Rate Pipeline
Your new studio setup only matters if brands can see the results. You need to update your portfolio with fresh footage that shows your improved production quality. Shoot three sample videos in your new setup and replace your oldest portfolio pieces.
Then raise your rates to match your new production tier. If you are at Tier 2, charge $300 to $500 per video. Build a structured rate card that lists your base fee, usage rights pricing, and package options. A clear rate card helps you negotiate from a position of preparation instead of guessing on every new inquiry.
Two resources will help you make this transition. The Rate Card Design That Makes Brands Say Yes shows you how to structure pricing that converts. The portfolio article on RightsForge gives you a framework for organizing your best work.
The 30-Day Studio Setup Plan
Here is a week-by-week plan to go from zero to a functional studio that commands higher rates. Follow this sequence and you never waste money on gear you do not need.
- Week 1: Find your filming spot. Buy a basic tripod ($15-$25) and a wired lavalier mic ($15-$25). Record your first three sample videos using window light. Total cost: under $50.
- Week 2: Add one artificial light source. A ring light for talking heads or a softbox for product shots. Total cost to this point: roughly $100.
- Week 3: Build two to three interchangeable background looks. One clean wall setup, one textured fabric backdrop, and one tabletop surface. Total cost to this point: roughly $150.
- Week 4: Upgrade to a wireless lav microphone ($60). Update your portfolio with three new videos shot in your improved setup. Send five brand outreach emails at your new rate. Total cost to this point: roughly $210 (well within Tier 2).
Within 30 days and a $210 investment, you can move from the beginner rate tier to mid-level rates. The same phone that got you $100 per video can now earn you $300 to $500 per video. The only difference is the gear and the system you put around it.
